QAICC Crafty
Bears of the north
This is the story of a quite complicated piece, which took my mum and me, at least 3 years to complete.
The designer, Cécile Vessière, made a series of bears, one piece for each season. Our favourite one was set in winter time, as it gives a really nice warm feeling. However, we never realised how tricky it was going to be.
As always, my mum wanted to make a piece on her own. She started it but quite quickly dropped it. She is much better with single-coloured pieces. Having to change thread makes her quite impatient. This is why I got involved. However, I didn't make it as quickly as I could have done it, especially because every single bear is delimitated. This is usually the annoying part for me. Even more so when for one bear there are more than 5 different colours to use. Impatient mum decided to help without knowing it was going to get even more confusing for me as I had to check extra-carefully what had been already done. It was my turn to drop it! After lots of arguing laughters and my mum giving many doe eyes to convince me to finish it, she finally decided to minimise the number of colours to delimit the bears. And this is the result of a mother-daughter collaboration.
Abécédaire ours (50 x 30 cm)
Design by Cécile Vessière
Crafty entomologist
It's not exactly papier mâché, just a quick paper craft to decorate walls, beam structures and so on when spring is round the corner.
To make it you need:
* sheets of paper
* all sort of coloured papers to stick (kraft paper, magazine paper, tissue paper, gift-wrapping paper...)
* white paper glue
* acrylic paint
* paint brushes
* thin wire
* tweezers
* a glue gun.
The idea is to make several layers of a same butterfly design and colour each layer in different ways.
Start with the largest layer but folding a white sheet of paper into 2. Draw on half of the desired shape, starting from folded side and then cut it. By opening the piece of paper, you will discover a symmetrical butterfly.
To cut the next layer, use the previous one to draw on a folded paper the same design. Then, before cutting it, draw a smaller shape following what you've just delineated. Cut the smaller shape. Do that as many times as you want layers.
Decorate each layer where your imagination takes you. Then, stick them together using the glue gun.
The butterfly body can be made in many different ways (papier mâché, piece of wood...). I always like wire as you can twist it. However you decide to make this body and the antenna, just use once more the glue gun to put in on the top of all the wings.
To hang the butterflies, I stuck a piece of wire using tape. Make sure it is discreet.
Origami basic folds - Squash fold
The Squash fold is a classic one you may have already used many times without knowing it was called that.
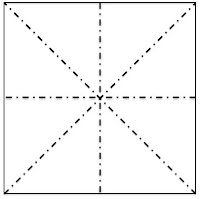
Start by folding a square piece of paper along the 2 diagonals and the 2 middle heights.
Re-open everything. You should get several marks shaped together in a sparkle right in the middle of your initial square of paper.
Next, fold your square along one of the diagonals. You should get a triangle marked as above.
Careful, the squash fold is coming. Start folding your triangle along the height coming out from the longest side, i.e. the hypotenuse. It is blue marked on the first drawing above. When the triangle right side (marked in grey on the first drawing) is at right angle with the left side (marked in white), slightly open it and push it down. The right side should take a square shape on the top of the triangle left side. The move which pushes down, squashes down part of the paper to flatten it is the squash fold.
The following video should help you to get the fold right.
Feline alphabet
There was always going to be one day when I would have to jump into my first big cross-stitch, the one where I wouldn't follow a pattern printed on a piece of fabric, the one where I wouldn't use a very stiff wide-meshed piece of fabric. The first true piece in a word.
Mine was a surprise for my mum, for her 43rd birthday. It was on linen and from the very first stitch, I knew I would never be able to use Aida fabric ever again. It was also quite old-fashion, only using beige and dark red. It became my favourite type of cross-stitching, easy, traditional and quite stunning when finished.
Sampler Chat (31x20 cm)
design by Jean-Louis Grandsire
Xmas 2012 on the windows
Xmas being upon us, this is a new series of Mehendis on the windows. I tried using smaller paint brush to be much more precise. It was lots of work... but not much results. It wasn't as spectacular from a distance as last year. It was simply a problem a scale. Bigger drawings in a bigger frame such as a window are much better.
Subscribe to:
Comments (Atom)


