Open box for an advent calendars


A basic origami which can be used in many crafting activities is the open box.
It starts with a square sheet of paper folded successively along the 2 diagonals. Re-open after each fold. You should obtain a paper square marked by a cross running from the corners.


Then, fold each corner to the middle of that cross to get a smaller square. To make sure you did it right, unfold everything to see if you get a sheet of paper marked like on the 4th following drawing.


From the square with the folded corners, fold 2 sides of that square toward the middle.


Re-open those 2 folds. Fold the 2 other sides.  To check if you did right, unfold everything. You should get the initial square with all the following marks.


From the initial square, fold 2 opposite corners towards the middle. Fold them another time, again towards the middle.  


Choose one of the 2 non-folded corners and fold it backwards, following the blue dotted line on the following drawing. You obtain 2 right-angle corners.


Imagine a square to which these 2 corners belong. Fold successively each one of them along the diagonal which runs through the imaginary square. Unfold them.

Once you've folded the 2 corners, unfold the corner of the initial square (the one folded backwards) too.
Use the other initial corner and redo the last 4 steps. 


By slightly unfolding the 2 other sides/corners (the ones folded towards the middle), the box should start forming. Simply orientate the tops of those 2 sides/corners towards the middle and wrap the unfolded corners around.


With this kind of box, a bit a wood and colour pencils, I chose to craft an Advent calendar. This is the result.


Pumpkin and Cie

Bye Bye Fall, bring it on Winter! This is a nice stitch to give as a Xmas present.


Harvest time (20.3x 25.4 cm)
design by Lois Thompson

Origami basic folds - Reverse fold


The reverse fold is quite useful, especially to make animals (neck, beak, nose and so on). The following series is a good exercise to practice to fold. A bird will appear at the end of it.
Fold a square sheet of paper along one diagonal. Re-open the piece of paper.


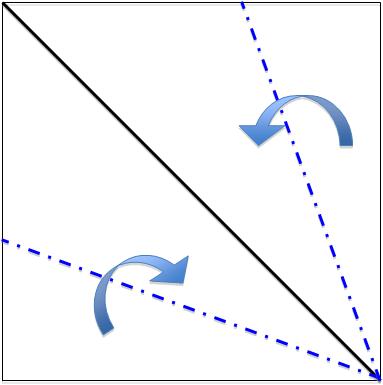
The square is now marked along a diagonal, which runs through 2 corners. Fold the 2 other corners towards the marked diagonal, following the 2 dotted blue lines. You should obtain a diamond with the 2 top sides smaller than the 2 bottom ones.
Fold the diamond inwards, following the initial diagonal (the diagonal slightly thicker on the drawing above). Thus, you obtain a triangle and the 2 corners you've just folded (grey on the drawing) disappear.


Now, it is time for the first reverse fold. Place the triangle you've just made in front of you, with the long side up. Fold the sharper angle upwards, following the blue dotted line, first in front of the un-moved paper part and then behind it. Mark this fold well, using your thumb nail.
Memorise the overall shape you get by folding either way and re-open the fold.

You should now push the paper upright, on either side of the un-moved paper part, using the mark you've just made, remembering the overall shape I ask you to memorise. This is an outside reverse fold.


Try it again, with the tip. Fold it towards the left, along the blue dotted line. First in front, then behind. Re-open it and push the tip on either side. The bird head just appeared.


Both reverse fold made here are outside reverse fold, meaning that the paper part to push sets on either side of the rest of the shape. There is also an inside reverse fold when the paper is push inwards, slightly disappearing inside the rest of the shape.

Mignonne, allons voir si la rose...


In primary school, pupils always have to learn poems. Some are remembered for life and mine was written by Pierre de Ronsard (1524-1585). The title was "Mignonne". It goes like this:

Mignonne, allons voir si la rose
qui ce matin avait déclose
sa robe de pourpre au soleil
A point perdu cette vêpré
Les plis de sa robe pourprée,
Et son teint au vôtre pareil.

Las! Voyez comme en peu d'espace,
Mignonne, elle a dessus la place,
Las, las! ses beautés laissé choir!
O vraiment marâtre Nature,
Puisqu'une telle fleur ne dure
Que du matin jusques au soir!

Donc, si vous me croyez, mignonne,
Tandis que votre âge fleuronne
En sa plus verte nouveauté,
Cueillez, cueillez votre jeunesse :
Comme à cette fleur la vieillesse
Fera ternir votre beauté


When I found in a magazine a beautiful rose stitched on tablecloth, I copied it and made my own cross-stitching. As it was for my granny, I slightly changed the wording. This is the result:

Papier Mâché - Introduction

 A amazing crafty work to do with children is "Papier Mâché", which literally translates to chewed paper. I've got to say, its consistency does look like that as papier maché is basically a paper pulp mixed with some adhesive, usually wallpaper glue. I remember that as a kid, I just loved being hands-on, whether I was baking cake or on the beach, making sand castles.  I loved being covered by wet sand as I loved mixing cake dough using my fingers rather than a spoon. So, when my primary teacher told my class we were going to wear aprons and make papier maché, it was a new experience I was eager to have fun with. 

Papier mâché is also quite easy to prepare. 

The first step is to cut so news paper confettis. I usually find that the smaller the better, as it mashes more easily. You can use a simple pair of scissors although it is quite time consuming. Using a paper shredder helps out. Plus it is quite fun. 

Once you have the confettis, soak them in water over night. Then, drain most of the water before adding the wallpaper glue. Careful, it should be neither too blobby nor  too sloppy. Remember, it has to be able to stand upright if you wish it. Too blobby (too mush glue), it won't be as easy to shape. Too sloppy (too much water), it won't shape at all. In both cases, the drying part will also be a problem.
I don't think there is a perfect ration to respect. It depends on what you want to do and what you are comfortable working with. Anything around 1/4 of the total volume being glue should be ok. 

It is also noteworthy that some people like to use a blender to prepare the paper pulp. In that case the paper confettis are even smaller which make the final craftwork quite smooth. It is also quicker to prepare. However, if you don't have such piece of equipment or if you don't want to use it, the method I described works really well. Remember, you can sand-paper papier maché, once it is dry, making look smooth too. Plus, I always cover the dried pulp with stripes of news paper stuck with some more wallpaper glue, before colouring the final crafty work. There are a few solutions, easy to operate, to smooth down papier mâché. 
On the other hand, it can be quite interesting to used rough-looking papier mâché to give some character to what you want to create.

Papier maché, once dry, is quite light. However, if you wish to make giant pieces, a good option to consider is to use a hollow structure to support the paper pulp. I tend to use metallic meshed fence rolls to give the initial shape of my finial construction. 

Papier Mâché has been used for many centuries, whether is was in Egypt to make masks or in Orient to decorate outfits. Nowadays, it is often perfect to prepare carnivals. But some artists have created some amazing pieces of work with papier mâché, my favourite of all being Niki de Saint Phalle with her Nana's sculptures. These are a couple of pictures of these sculptures I found on the web:


Magic glue


For all my crafty works, there is ONE crafting material I use most of the time which is the combo glue/varnish. It is amazing to stick all sort of paper types to customise boxes, furniture, books and so on.  The varnish guarantees some protection.

Glue

These are a few of the objects I customised over the years.

Gift wrap

Shoe boxes

Cooking notebook


Paper flags of Thailand

Visiting Thailand, one is amazed by how much Buddhism is part of the society. Chiang Mai, the second city, about 700 km North of Bangkok is known to be the city of temples with over a thousand ones within the city walls and in the surroundings. 

Buddhist temples are always bright and colourful. Many decorations contribute to that, including paper flags, cut by the monks and usually gathered into bunches. 


They are quite easy to make. Just follow the steps described below.


Fold 1
     
Use a square colourful sheet of tissue paper, about 30 x 30 cm. Fold it into 2, following a diagonal.


Fold2
Fold 3
The next fold is done along the height of the triangle you've just obtained. Use the height coming from the right angle. Repeat this action
Final shape

Fold 4


For the forth fold, don't follow the same height. Instead, use one of the other heights


 Cut really thin triangles along the dotted lines to form a zigzag.


In the top part of the final shape, the uncut part, cut out some shapes. Be creative but keep it simple.


Unfold everything but be careful as it is quite fragile. You should get something looking like the square displayed on the left. The blue cross shows where you should attach a string. In Thailand, people sometimes then attach this string to a wooden stick, but quite often, especially in temples, the kites are just attached together without using wood. If you do wish to use a wooden stick, don't make the string too long. Once attached, gently push the corners down to form some sort of tube. Your kite is ready.


This is the one I made just before writing this post.